An easy way to square up the edges of your quilt, before adding binding.

This is the La Passacaglia quilt by Willyne Hammerstein.
Pattern in the Millefiori Quilts book published by Quiltmania.
There are no straight blocks to measure off of, to square up the outside edges before adding binding.
Sharon Schamber shared this tip years ago. She used to have a learning platform that was free or you could subscribe to. I choose the subscribe option, because I learned so much and wanted to support her efforts. Her binding technique, which I share on my website, as a feature video, is the way I do all my bindings.
Sharon's top tips: At least for me, she is such a pro!
1. Elmer's School Glue instead of pins
2. Her binding technique, which involves school glue
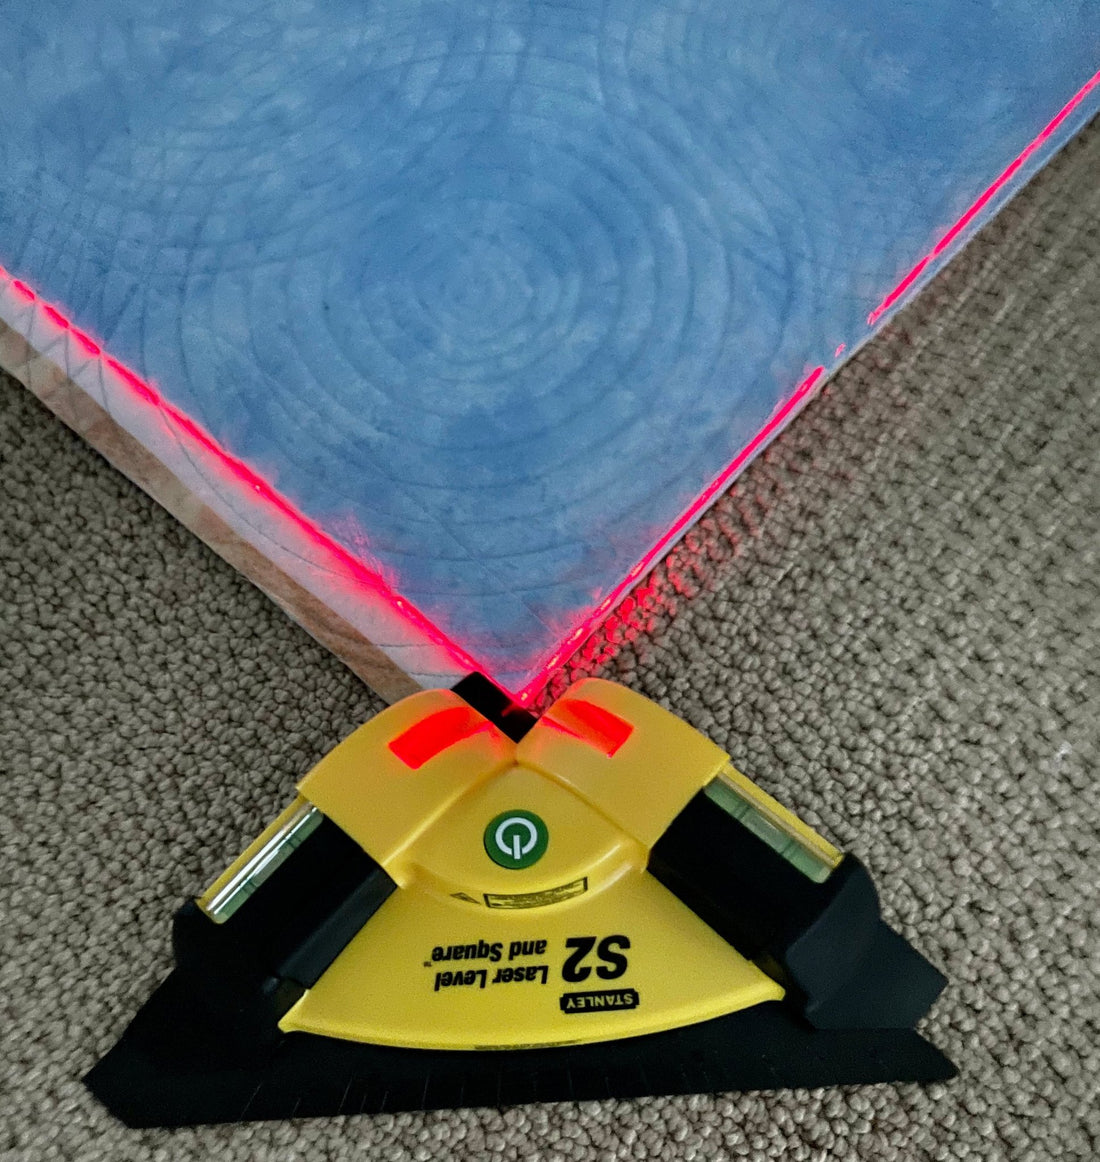
3. The hardware laser level and square tool
So back to the laser, here is a link for a similar brand on Amazon, not an affiliate link, just FYI
Brewer Sewing Supplies (Wholesale only) posted a tool like the hardware level for quilting. I have spent 30 minutes looking and can not find it. I will update after I call them on Monday.

Push the green button and the light shoots out in two directions. it is battery powered.

Carefully mark the laser line, without moving the laser. If you accidentally move the laser, realign with the marks you already made.
I am using the Sewline Air Easing marker. (Comment about that to follow)

This close up shows the laser, fortunately has that space on the right side that does not have the black plastic piece, you see on the left.
This allows me to get a small ruler in the corner, lining the horizontal ruler line with the laser line extending up.
Now I can move the laser, holding the ruler in place.
Mark to the line on the rule, that lined up with the corner.
Realign the laser with your previous marking and continue.
Another option, with the laser in place you could carefully mark the corner freehand. I am not a good at free hand, but looking at these pictures I see that as option now.

The rotary cutting mat is on the floor to provide a stable surface for marking and trimming the edge, once it is marked.

I am use a 4" x 35" Olfa ruler to trim the edge.
You can use whatever size ruler you have.
The longer ruler enables a longer cut, less time spent lining up for the next cut.
Place the rule on the quilt side and trim, making sure the mat is far enough under the quilt so you are not cutting your carpet.
Sorry the ruler did not make it into the picture.
If you were to trim with the ruler on the mat side vs on the quilt side, there is a good possibility the quilt would not lay flat.
I did not mark the entire outside of the quilt. Pretty sure I made numerous marking spaced out along the laser light. That is why you still see the laser light on. I made the marks and then use the light to connect the lines and trimmed.

This is the pen I used to mark with.
Note: the marking is only supposed to last a few hours.
That way you do not have to remove the marking. Some pens come out with water or and ironing, all steps I don't want to preform.
So plan your work time accordingly. Don't mark one day, then plan to come back the next day. The marks will disappear.
I was surprised to see this did not disappear. All the rest of marks did disappear. It really does not matter because it is the cut line.
That is how you do it. Hopefully I have not made it seem complicated.
It is not.
I like to explain in detail, to offer as much information about the how and why.
I am adding a bit more information about the binding.

Fabric for binding, Moda Ombre Fairy Dust Metallic, jelly roll. I did not use the whole jelly roll, left over fabric is not a problem for me.
It was a way to get all the colors, already cut 2-1/2", which is the size I like to use for binding.
There are some many colors in the quilt I wanted to extend that variety to the binding.
I am previewing the placement of color. After arranging a couple of times, I was pleased with this.
Note: I did not straight seam the strips together, they were seamed on an angle like you normally connect binding strips.

You can see the angle piecing of the binding here.
The other reason for this photo is to show that I apply (with glue) and press my binding on the floor. If you take this to the ironing board it would not lay flat.
The iron is on a wool pressing mat. The Oliso Pro iron does not burn the mat.
As you may know when you let go of the iron it pops up, no longer applying heat to the surface.
Product Idea: A large pressing mat that reflects the heat back, as to not damage the carpet. The pressing mat should be able to fold up for storage when not in use. So far no interest in that idea.

Here is my quilting companion and the end result.
Thank you for taking the time to read this.
Comments and questions are always welcome.
Sign up for my newsletter for updates when I post new time-saving tips and techniques, helping you make the most of your creative time.
Another blog post with lots more details about binding.
3 comments
Thanks for this post! I will be buying myself one of those laser levels! Already saved it in my Amazon shopping list for next payday! I always have trouble squaring up quilts, and this is going to help me tremendously!
Genius, thanks for sharing. I love those Sharon Schamber videos.
Thank you. The laser tool is something I’m very interested in getting.